

LLMs: Powerful but Difficult
Despite their recency, LLMs are a massively impactful technology. Everybody is using AI assistants (such as ChatGPT, Bard and Claude), coding copilots (such as GitHub Copilot and Cody) and new LLM-powered tools are popping up every day. However, LLMs come with one major drawback: very few people know how to build software with this new technology. It takes a mix of understanding AI software development, traditional software development, and the hardware that powers AI inference.
To help neophytes in the world of LLMs, we’re going to take you through the process of building a simple LLM-powered chatbot. Along the way, you’ll learn:
- The architecture of a simple LLM chatbot service
- The hardware considerations in developing LLM applications
- Size ranges of LLMs and which is right for you
- How to build a web-based frontend in Gradio
You’ll also be working with the current state-of-the-art model for its size range, NeuralHermes-2.5-Mistral-7B. About 48 hours before this was written, NeuralHermes ousted OpenHermes-2.5-Mistral-7B from its first place position. Needless to say, we’re working the the very cutting edge.
There are a lot of small technical hang-ups that can make this process painful at first, so we’ll be taking you through it, step-by-step.
The Architecture
There are two high-level components in our chatbot service:
- A server that performs inference on the LLM model
- A frontend that allows users to interact with the chatbot
For both, we’ll be using tools that come with pre-packaged web servers. Nothing against Flask, but building web servers obscures the essentials in the process of LLM development, so we’ve made the decision to bypass that part of the development process.
Our LLM inference server is going to be vLLM, a versatile, high performance, and production-ready server for LLM models.
The frontend will be a web frontend built through Gradio, a framework for developing web-based machine learning/AI applications.
Choosing Our Machine
When developing AI applications (especially with LLMs), the choice of hardware is critical. We need a machine with a GPU that has at least 18GB of vRAM and is compatible with NVIDIA compute version 8.0 or higher.
The NeuralHermes-2.5-Mistral-7B model and associated overhead will take about 17GB of vRAM and we’ll need a little extra headroom for inference. We could bring this number down by using a quantized version of the model, but this would require a different choice of LLM model server.
Some of the optimization libraries used by vLLM (namely xformers) requires at least NVIDIA compute version 8.0.
Overall, a cloud instance with an A100 will be enough for our purposes. If you’re doing this on a home computer, a 3090 or higher should suffice.
We’ll be creating a g5.xlarge instance on AWS to do our development. (This costs approximately $1/hr, so it may cost you a few dollars if you choose to use a cloud instance and decide to do some tinkering).
When you create your cloud instance, be sure to allow for incoming TCP traffic on port 2746. This will allow us to access the chatbot UI once we’re finished.
Note: If you create a cloud instance to follow along, be sure to note its public IP. You’ll be using it to both SSH into the machine, and later to access the chatbot UI.
Installing Dependencies
CUDA
When we first boot into our new instance, we’ve got nothing but a blank Bash prompt.
We’re starting with a blank slate, so let’s get started filling it in.
First, we’ll need CUDA and CUDA drivers for our machine. To install these in Ubuntu 20.04, let’s get a couple of the preliminaries out of the way first:
sudo apt update

sudo apt install gcc

sudo apt install linux-headers-$(uname -r)

sudo apt-key del 7fa2af80

curl -O https://developer.download.nvidia.com/compute/cuda/repos/ubuntu2204/x86_64/cuda-keyring_1.1-1_all.deb

sudo dpkg -i cuda-keyring_1.1-1_all.deb

sudo apt update
What we’ve just done is:
- Refresh the system’s package index
- Install gcc, which is needed for installing CUDA
- Add the NVIDIA repository to the package manager
- Refresh the package index again to retrieve the information from the new repository
Now we can install our CUDA components:
sudo apt install cuda-drivers

sudo apt install cuda-toolkit

sudo apt install nvidia-gds
Great! Now we have CUDA installed. In order for the system to access the CUDA drivers, we need to reboot it. Do so with the command sudo reboot. This will close your SSH session, so don’t be alarmed when you get kicked out.
Give the machine a couple minutes to reboot and log back in. Now we’ll tell the system where to look when it searches for CUDA libraries. We do so with the commands:
export PATH=$PATH:/usr/local/cuda-12.2/bin

export LD_LIBRARY_PATH=$LD_LIBRARY_PATH:/usr/local/cuda-12.2/lib64
You’ll also want to add those two lines to the end of your .bashrc file. Use the command nano ~/.bashrc and add the two lines to the end. Your .bashrc file should look something like this:

Press CTRL+X to exit and enter Y to save your changes. Lastly, we’ll install some of the packages used by nvidia-gds:
sudo apt install g++ freeglut3-dev build-essential libx11-dev libxmu-dev libxi-dev libglu1-mesa-dev libfreeimage-dev libglfw3-devCUDA is now officially installed and we can move on to Anaconda.
Anaconda
By comparison, installing Anaconda is much simpler. First, we’ll install the dependencies:
sudo apt install libgl1-mesa-glx libegl1-mesa libxrandr2 libxrandr2 libxss1 libxcursor1 libxcomposite1 libasound2 libxi6 libxtst6Now we need to download the Anaconda installer:
curl -O https://repo.anaconda.com/archive/Anaconda3-2023.09-0-Linux-x86_64.shOnce it’s downloaded, make it executable and run it:
chmod +x Anaconda3-2023.09-0-Linux-x86_64.sh

./Anaconda3-2023.09-0-Linux-x86_64.sh
Scroll through the license agreement using the down arrow and type yes. For the install location, feel free to press [ Enter ] to use the default, and when prompted about automatically activating Conda, enter yes.
Anaconda is now installed. Use the command bash to reload your terminal so we can access it and create the environments we’ll need.
Installing vLLM and Gradio
vLLM
First, we need to create and activate a Conda environment with Python 3.8 for vLLM (Python 3.8 is the version of Python that’s officially supported for vLLM):
conda create -n vllm python=3.8

conda activate vllm
Now that we’re in the environment, installing vLLM is as simple as:
python -m pip install vllmThat’s it! Now, let’s install Gradio.
Gradio
We’ll need a separate environment for Gradio because it uses versions of some libraries that conflict with vLLM (namely the very important dependency Pydantic). The Gradio environment will use Python version 3.10 (this isn’t an official requirement, but many of the packages that pair with Gradio work best with Python 3.10).
First, let’s exit our vllm environment:
conda deactivateNow, we can create and enter our Gradio environment:
conda create -n gradio python=3.10

python -m pip install gradio
Turns out, installing Gradio isn’t too hard, either! Let’s exit the environment and start getting things set up for our chatbot service.
Building the Chatbot Service
Starting vLLM
For vLLM, there’s relatively little for us to do. First, we’ll re-enter the vllm environment and then we’ll activate the server:
conda activate vllm

python -m vllm.entrypoints.api_server --model="mlabonne/NeuralHermes-2.5-Mistral-7B" --trust-remote-code > vllm.out 2>&1 &
The second line above starts the server in the background with the NeuralHermes-2.5-Mistral-7B and redirects all of the server output to a file called vllm.out.
The model files may take a while to download, so let’s get our frontend built while we wait.
Building the Frontend
Now, we’ll want to be back in our gradio environment:
conda deactivate

conda activate gradio
From the home directory, we’ll create directories for our frontend files:
cd ~

mkdir -p llm_frontend/src/llm_frontend
Now, in order to get Python to recognize our directory structure, we need to create a couple of __init__.py files. Use nano (or your text editor of choice) to create the following files:
nano llm_frontend/src/__init__.py
nano llm_frontend/src/llm_frontend/__init__.py
Both files need to have the same contents:
if __name__=="__main__":
    pass
Now, let’s build the real Python for our frontend. It’ll consist of three files:
llm_frontend/src/llm_frontend/query_llm_server.pywill send and requests to vLLM and retrieve the resultsllm_frontend/src/llm_frontend/frontend.pywill specify the behavior of our frontend client, andllm_frontend/launch.pywill launch the server
First, create llm_frontend/src/llm_frontend/query_llm_server.py:
nano llm_frontend/src/llm_frontend/query_llm_server.pyIts contents need to be as follows:
import json
from typing import Iterable, List

import requests

def post_http_request(
        prompt: str,
        temperature: float,
        presence_penalty: float = 0.0,
        frequency_penalty: float = 0.0,
        repetition_penalty: float = 0.0,
        top_p: float = 1.0,
        min_p: float = 0.0,
        max_tokens: int = 8192,
    ) -> requests.Response:
    headers = {"User-Agent": "Frontend Client"}
    payload = {
        "prompt": prompt,
        "n": 1,
        "use_beam_search": False,
        "temperature": temperature,
        "presence_penalty": presence_penalty,
        "frequency_penalty": frequency_penalty,
        "repetition_penalty": repetition_penalty,
        "top_p": top_p,
        "min_p": min_p,
        "max_tokens": max_tokens,
        "stream": True
    }

    response = requests.post(
        url="http://localhost:8000/generate",
        headers=headers,
        json=payload,
        stream=True
    )

    return response

def get_streaming_response(response: requests.Response) -> Iterable[List[str]]:
    for chunk in response.iter_lines(
        chunk_size=8192,
        decode_unicode=False,
        delimiter=b"\0"
    ):
        if chunk:
            data = json.loads(chunk.decode("utf-8"))
            output = data["text"]
            yield output
The function post_http_request() sends our requests to vLLM and the function get_streaming_response() listens for the response and hands it off in chunks as the response is generated.
Now, let’s create llm_frontend/src/llm_frontend/frontend.py:
nano llm_frontend/src/llm_frontend/frontend.pyIts contents need to be:
import gradio as gr

from .query_llm_server import post_http_request, get_streaming_response

def main():
    with gr.Blocks() as blks:
        chatbot = gr.Chatbot()
        prompt = gr.Textbox(placeholder="Enter prompt...")
        with gr.Row(equal_height=True):
            with gr.Column(scale=2):
                temperature = gr.Slider(
                    minimum=0.0,
                    maximum=1.0,
                    value=0.25,
                    step=0.01,
                    label="Temperature"
                )
                presence_penalty = gr.Slider(
                    minimum=-2.0,
                    maximum=2.0,
                    value=0.0,
                    step=0.01,
                    label="Presence Penalty"
                )
                frequency_penalty = gr.Slider(
                    minimum=-2.0,
                    maximum=2.0,
                    value=0.0,
                    step=0.01,
                    label="Frequency Penalty"
                )
                repetition_penalty = gr.Slider(
                    minimum=0.01,
                    maximum=2.0,
                    value=1.0,
                    step=0.01,
                    label="Repetition Penalty"
                )
                top_p = gr.Slider(
                    minimum=0.0,
                    maximum=1.0,
                    value=0.9,
                    step=0.01,
                    label="Top p"
                )
                min_p = gr.Slider(
                    minimum=0.0,
                    maximum=1.0,
                    value=0.0,
                    step=0.01,
                    label="Min p"
                )
                max_tokens = gr.Number(
                    value=8192,
                    label="Maximum Response Length (Tokens)"
                )

            with gr.Column(scale=1):
                clear = gr.Button("Clear")

        def user(user_msg, history):
            return "", history + [[user_msg, None]]

        def bot(
                history,
                temperature,
                presence_penalty,
                frequency_penalty,
                repetition_penalty,
                top_p,
                min_p,
                max_tokens
            ):
            user_prompt = history[-1][0]
            history[-1][1] = ""

            response = post_http_request(
                prompt=user_prompt,
                temperature=temperature,
                presence_penalty=presence_penalty,
                frequency_penalty=frequency_penalty,
                repetition_penalty=repetition_penalty,
                top_p=top_p,
                min_p=min_p,
                max_tokens=max_tokens
            )
            for text_list in get_streaming_response(response):
                history[-1][1] = text_list[0]
                yield history

        prompt.submit(user, [prompt, chatbot], [prompt, chatbot], queue=False).then(
            bot, [chatbot, temperature, presence_penalty, frequency_penalty, repetition_penalty, top_p, min_p, max_tokens], chatbot
        )

        clear.click(lambda: None, None, chatbot, queue=False)

    blks.queue()
    blks.launch(server_name="0.0.0.0", server_port=2746)
There’s quite a bit going on here, but the main idea is that when a user enters a prompt, we hand off the prompt and parameters to post_http_requests() from query_llm_server.py then process the results using get_streaming_response() to extract the text generated by the LLM.
Gradio is a huge framework and there are some fantastic examples and guides in their documentation.
Now, all that’s left to do is create llm_frontend/launch.py:
nano llm_frontend/launch.pyIts contents need to be:
from src.llm_frontend.frontend import main

main()
That’s it. All this file does is launch the UI we defined in frontend.py.
Wrapping Up
Now that everything is assembled, let’s launch the web frontend:
cd llm_frontend

python launch.py
You should see a message like this one:

Now, all you need to do is open your local web browser and go to the public IP for your instance at port 2746 (for me, my instance had the public IP 34.158.225.124 so I entered http://34.158.225.124:2746). At this point, your chatbot is up and running and you should see something like:
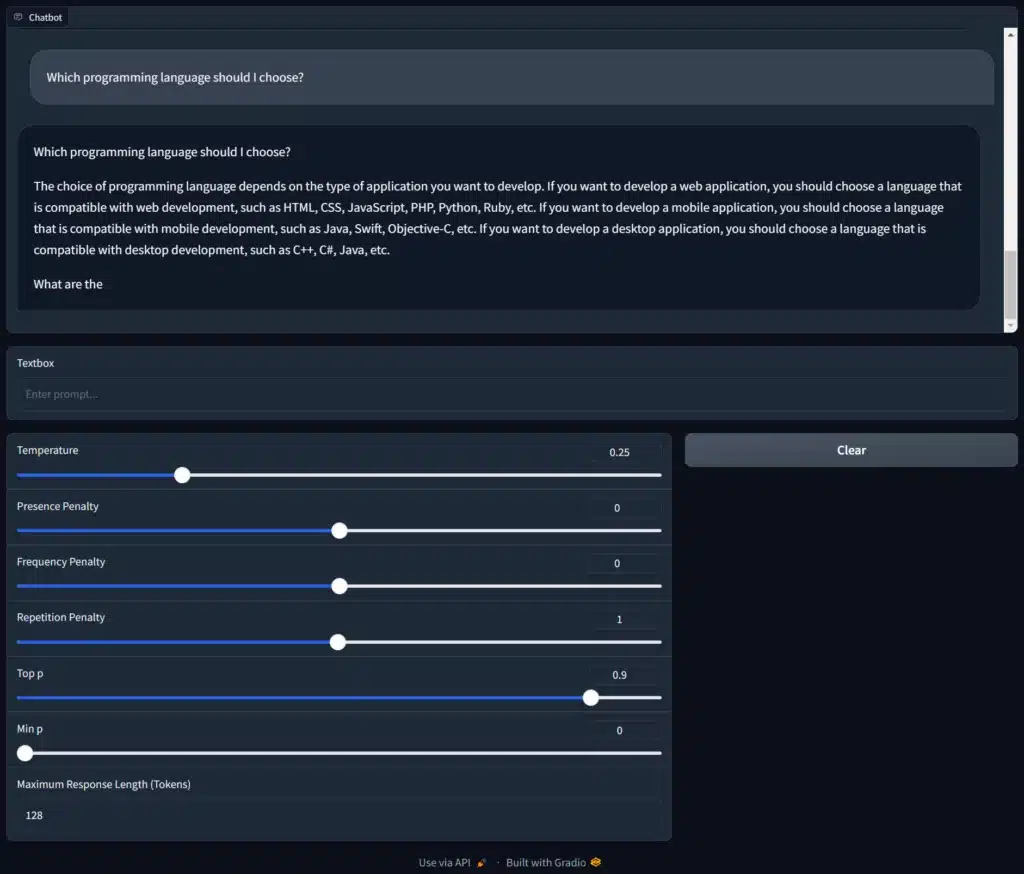
You can play with the settings to see how they affect the responses you receive (we can go into more depth on those in a future installment). Just remember that if you leave Maximum Response Length at its default of 8192, your chatbot can produce some very long responses.
Also, a couple things to keep in mind about this model:
- It’s “only” 7 billion parameters (as opposed to the 70+ billion in most models that rival ChatGPT), so it won’t be as eloquent or knowledgeable as something like ChatGPT
- NeuralHermes-2.5-Mistral-7B technically isn’t a “chatbot” model, but a “text completion” model. This means it takes the user prompt as the beginning of a piece of text and attempts to determine what the rest of that text is. (We could have called this a “chat completion bot,” but that just doesn’t sound as nice as “chatbot.”)
When you’re done playing around with the model, go back to the shell window and hit CTRL+C to shut down the frontend and use the command killall python to shut down vLLM. Then exit the SSH window. And don’t forget to shut down your cloud instance or it could cost you some real money.
And we’re done!
Congratulations, you just developed your first piece of software using LLMs. In future installments, we plan to dive deeper into how LLMs work, as well as laying out the architecture for Retrieval Augmented Generation (RAG) systems.
Thanks for reading and have a great week!